
前言
作为大数据离线计算重中之重,Hive在大数据领域占有绝对的一席之地.众所周知Hive的提供了两种对外的服务访问
方式,譬如HiveCli,或者HiveServer2(beeline)方式访问,Hive官方已经弃用了HiveCli方式,建议采用HiveServer2访问
方式.
对于大数据安全一直是业界比较关心的话题,说到安全不得不提两个概念.一个是认证一个就是授权,在大数据认证方面
kerberos应用非常广泛.他提供了Hadoop访问的认证服务.提到授权业界非常火的就是sentry和ranger了.目前提供的
HiveServer2 认证中官方提供了LDAP,Kerberos,自定义认证方式,本文笔者聊一聊自定义MySQL认证的方式,并且二次开发
实现基于MySQL的HiveServer2认证.
开启认证
工作原理介绍:HiveServer2访问元数据的过程中被自定义用户认证拦截,查询MySQL中的用户名密码进行比对,如果用户名密码 匹配正确认证通过,即可登录.
- 开启用户自定义认证
<property>
     <name>hive.server2.authentication</name>
     <value>CUSTOM</value>
</property>
- 添加其他自定义项
<property>
     <name>hive.server2.custom.authentication.class</name>
     <value>org.apache.hadoop.hive.contrib.auth.CustomAuthenticator</value>
</property>

<property>
     <name>hive.server2.custom.authentication.user-password.mysql</name>
     <value>jdbc:mysql://xxxx:3306/hiveserver2_passwd?useUnicode=true</value>
</property>

<property>
     <name>hive.server2.custom.authentication.user-password.mysql-user</name>
     <value>hiveserver2</value>
</property>

<property>
     <name>hive.server2.custom.authentication.user-password.mysql-password</name>
     <value>hiveserver2</value>
</property>

<property>
     <name>hive.server2.custom.authentication.user-password.mysql-table</name>
     <value>hiveserver2_passwd</value>
</property>
- 新建数据库表导入MySQL脚本
DROP TABLE IF EXISTS `hiveserver2_passwd`;
CREATE TABLE `hiveserver2_passwd` (
  `id` int(255) NOT NULL AUTO_INCREMENT,
  `username` varchar(255) COLLATE utf8_bin NOT NULL,
  `password` varchar(255) COLLATE utf8_bin NOT NULL,
  PRIMARY KEY (`id`,`username`,`password`)
) ENGINE=InnoDB AUTO_INCREMENT=6 DEFAULT CHARSET=utf8 COLLATE=utf8_bin;
- 编写认证代码
package org.apache.hadoop.hive.contrib.auth;

import org.apache.hadoop.hive.conf.HiveConf;
import org.apache.hive.service.auth.PasswdAuthenticationProvider;

import javax.security.sasl.AuthenticationException;
import java.sql.*;
import java.util.Hashtable;

public class CustomAuthenticator implements PasswdAuthenticationProvider {

    private static String url ;
    private static String username;
    private static String password;
    private static String driverName;
    private static String table ;

    static{
        HiveConf conf = new HiveConf();

         url = "";
         username = "";
         password = "";
         driverName = "com.mysql.jdbc.Driver";
        table = "";

        String mysql_url = conf.get("hive.server2.custom.authentication.user-password.mysql");
        String mysql_username = conf.get("hive.server2.custom.authentication.user-password.mysql-user");
        String mysql_password = conf.get("hive.server2.custom.authentication.user-password.mysql-password");
        String mysql_table = conf.get("hive.server2.custom.authentication.user-password.mysql-table");

        if(mysql_url != null && mysql_username != null){
            url = mysql_url;
            username = mysql_username;
            password = mysql_password;
            table = mysql_table;

        }

    }
    public NeiBitSampleAuthenticator() {

    }

    private static Hashtable<String, String> getStore(){
        Hashtable<String, String> hash_store = new Hashtable<String, String>();
        try {
            Class.forName(driverName);
        } catch (ClassNotFoundException e) {
            e.printStackTrace();
        }

        String queryUserData = "select id,username,password from " + table;

        Connection con = null;
        Statement state = null;
        ResultSet assertion = null;
        try {
            con = DriverManager.getConnection(url, username, password);
            state = con.createStatement();
            assertion = state.executeQuery(queryUserData);
            while (assertion.next()) {
                hash_store.put(assertion.getString("username")
                        ,assertion.getString("password"));
            }

        } catch (SQLException e) {
            e.printStackTrace();
        }finally {
            if(assertion != null) {
                try {
                    assertion.close();
                } catch (SQLException e) {
                    e.printStackTrace();
                }
            }
            if (state!=null) {
                try {
                    state.close();
                } catch (SQLException e) {
                    e.printStackTrace();
                }
            }
            if(con!=null) {
                try {
                    con.close();
                } catch (SQLException e) {
                    e.printStackTrace();
                }
            }
        }
        return hash_store;
    }

    @Override
    public void Authenticate(String user, String password) throws AuthenticationException {
        String storedPasswd = getStore().get(user);

        if (storedPasswd != null && storedPasswd.equals(password)){
            System.out.println("密码正确");
        }else{
            throw new AuthenticationException("认证失败"+ user +"用户名或者密码错误");
        }

   }
}
代码逻辑比较简单.首先实现PasswdAuthenticationProvider,其次通过静态代码块从数据库中获取用户名密码,然后在比对用户名 密码即可
部署
- 把上述代码打包后,放到hive的classpath下,重启hiveserver2即可
测试
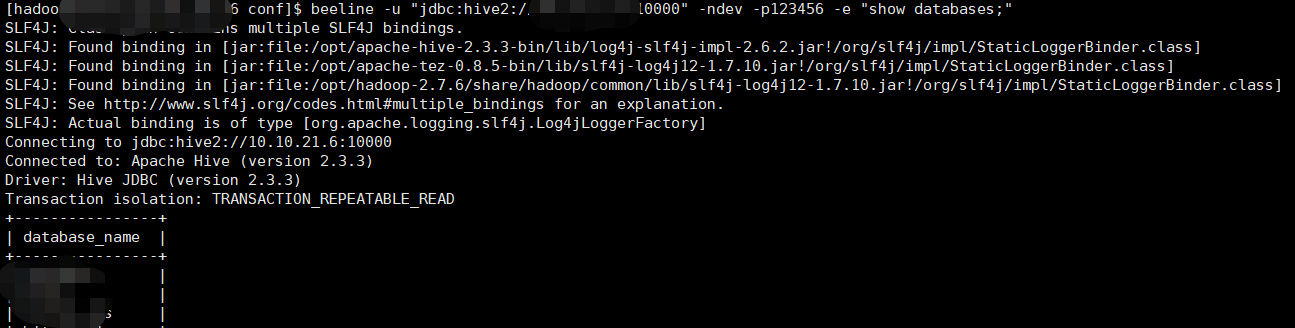
执行如下命令测试
beeline -u "jdbc:hive2://10.10.21.6:10000" -ndev -p123456 -e "show databases;"
如下图为执行后的效果
注意
从MySQL中获取用户名密码一定要使用静态方法和静态代码块,否则会一直连接thrift访问,导致hiveserver2启动失败.
总结
以上记录了HiveServer2基于MySQL认证方式.希望本文对读者起到帮助作用.